UTILIZE YOUR DESIGNER PAPER
When I saw the sentiments on the Up & Away Dreams paper, I knew I had my cover and it was pretty easy to embellish, too. When you begin with a well designed paper, you seldom have to embellish beyond what is already there for you.
On my cover, seen above, I added the green banner sticker and the heart {I do love it all!}, but the other graphics are all part of the amazing paper design.
CREATIVE USE OF STICKERS
By adding stickers to your pages, you've added interest, dimension and character. The added bonus is that often times the stickers are a jumping off point for your journaling.
MAKE YOUR JOURNALING SPOTS WORK FOR YOU
Think you won't use all those journaling spots?
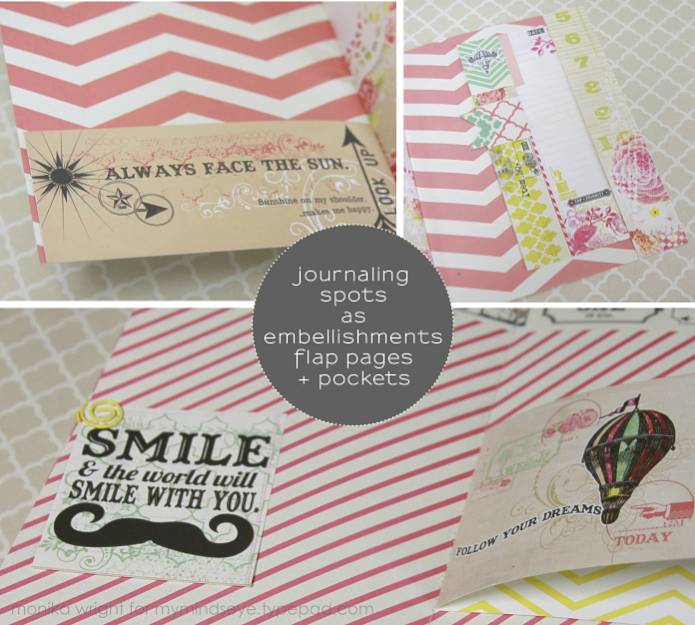
- Have you thought about using them to add pockets to your pages? Add adhesive to three sides of your journaling card and pop onto your page, like I did on the inside front cover.
- For the inside back cover, I used on of the more narrow journaling elements to adhere on three sides, added yet another journaling spot inside the pocket I created and then popped on some arrows from the sticker accessory sheet as a pull tab.
- Look in your stash for a cute paper clip to add a journaling embellishment to your page.
- Or even trim a series of journaling spots and add it to your mini book as a page.
TUTORIAL
Using the Find Your Wings and Fly Collection Paper & Accessories Kit
Cover | Trim your Up & Away Dreams paper to 12" wide x 8" tall and score at 6". I chose to trim away the banners at the top of the paper, but you do what makes your heart happy. Embellish cover with various stickers from the sticker accessory sheet.
Inside Front Cover | Trim journaling spot and add to inside cover to form a pocket by adding adhesive to three sides, leaving the top edge free of adhesive to slip photos or ephemera inside.
Scalloped Border Page | Trim the Krafty Floral paper to 10.50" wide x 7" tall and score at 5.75". Choose your favorite border punch and fold over to form an interesting detail. Add sticker from sticker accessory sheet.
Rounded Edge Page | Trim Carousel paper to 8.25" wide x 6.75" tall and score in center
Happy Journaling Card Page | Trim the Big Top paper to 11" wide x 7" tall, scoring at 5.50". Choose your favorite journaling spots to add to the front, inside and back of page as seen in photo earlier in post.
Journaling Card Flap Page | Trim journaling spots from the Always paper, as seen in photo earlier in post, and score where needed. Add stickers from sticker accessory sheet.
Inside Back Cover | Trim journaling spots from the Always paper. Add adhesive on three sides, leaving room to slip another journaling spot inside the pocket you've created. Add stickers to form a pull tab.
To bind your mini album, arrange your scored sheets of paper in a pleasing, staggered arrangement. Clip the pages on one side to hold them in place while stitching and don't forget to backstitch at both ends to hold your pretty papers permanently in place.
'll be using my mini book to share my thoughts about opening my Etsy shop three years ago and my dreams for the growth and future of my company. I'll share the completed mini book on the blog next week. What will you use yours for?
'll be using my mini book to share my thoughts about opening my Etsy shop three years ago and my dreams for the growth and future of my company. I'll share the completed mini book on the blog next week. What will you use yours for?
I'm happy to answer any questions you leave in the comments!
This mini book was originally featured on the My Mind's Eye blog for my monthly
Mini Albums with Monika feature, but I wanted to share the tutorial here as well.
Mini Albums with Monika feature, but I wanted to share the tutorial here as well.


This is lovely, really pretty. I love mini albums.
ReplyDeleteGorgeous mini album! I love all your tips and tricks and the way you pay attention to each printed word and give it meaning, rather than just using the 'pretty paper' :)
ReplyDeleteThank you for noticing, Avital! : D
DeleteSuper cute :-) I'm always in love with your minis.
ReplyDeleteThanks for sharing your tips and tricks.
Thank you for sharing this great tutorial! The mini album is really nice!
ReplyDeleteNice and Clean London